3: Make a new file
3.1 Introduction
From the File menu choose New. In the dialog box name your
file and the directory where it will be saved.

Tip: After this you will be able to use export functions allowing in
particular saving in another format. When creating a new book I
recommend you select an empty directory created for this purpose. By
doing this you can gather in a single place the information that is
useful to you for the work in progress, whether this is from oStorybook
or not. For your own organization, gathering all your information,
including the oStorybook file in one folder, makes things easier,
especially for backups.
3.2 Note
Most of the examples in this manual are based on "Le médecin malgré
lui ", a play by Molière. So I chose the file name "LeMedecinMalgreLui"
without using spaces and marking each word with a capital letter. The
file created on your hard disk will take the extension "h2.db", or
"mv.db", or "osb5" depending on the operating system in use.
3.3 Naming advice for file
Important Note on File Name: Do not use special characters such
as / \? * : or others. For more information see Wikipedia article. A
correct filename should contain only alphanumeric characters (A-Z, a-z,
0-9), space, underline, and dash.
Examples :
The following names (without quotation marks) are correct
-
"lemedecinmalgrelui"
-
"Le medecin malgre lui"
-
"Le_medecin_malgre_lui"
Names like these are incorrect :
-
"Le medecin malgre lui"
-
"le/medecin/malgre/lui"
3.4 Appearance
After creating the file, oStorybook looks like this:
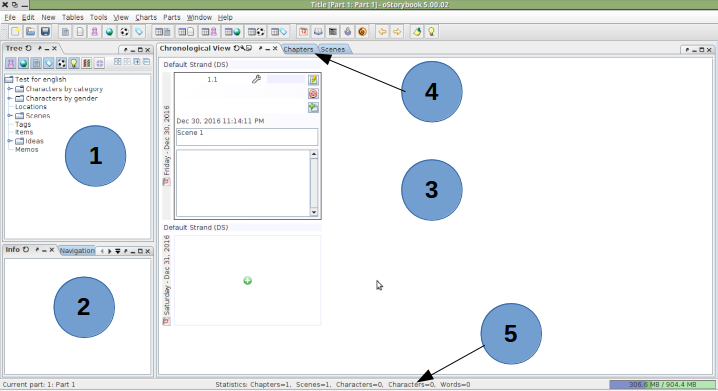
At the top is a traditional menu and toolbar of icons which are
shortcuts to the corresponding functions.
3.5 Note on the panes of the oStorybook main window
These sub-windows, called views, are anchorable (dockable). Dockable
sub-windows work the same way as a traditional application window,
without it being exactly like a normal window.
Dockable sub-windows can be moved, closed, minimized,or maximized. For
now leave them as is. If you accidentally close a pane and you can not
find it again, you can still use the default presentation via the Windows
menu.
3.6 Detail
-
This pane shows a tree list. The objects listed are the characters,
locations or scenes in hierarchical order. For more information on how
to use this view, see chapter "14.9 Tree view".
-
This pane shows information about an object. It is associated with the
selected object in the tree or any of the views. For example, by
clicking an object in the tree, its information will appear in this
pane.
-
This view is called "Chronological View". The
chronological view shows the scenes in chronological (date/time)
order. As you can see, the first scene is already created.
-
Dockable panes can be organized via their tabs, much like the Firefox
tabs. Four of these tabs are currently open and available. Click one
of the tabs to change the view. See chapter "4.1 Aspects and
use".
-
The status bar always provides three items of information:
-
The component you are working on, see chapter "12.3 Parts".
-
Summary statistics, see chapter "6.5 Detail of the File
Information tab"
-
A bar graph showing memory usage of your computer.
The first thing to do after creating your file is to fill in the main
properties of the book, see chapter "6. Properties".
3.7 Menus
List of menu items:
-
File
-
New: create a new oStorybook file
-
Open: open an existing oStorybook file
-
Recent files: open one of the recently used files
-
Save: reserved for future use, currently saving is automatic
-
Save as ...: create a copy of the currently open file under a new
name
-
Rename: change the file name
-
Close: close the current file; if there is no other file open you
will also exit oStorybook
-
Properties: view / modify the properties of your book, see chapter
"6. Properties"
-
Import ...: reserved for future use
-
Export: export data from your file to another format
-
Exit: exit oStorybook
-
Edit
-
Copy the book to the clipboard, ready to be used by "paste" in
other software
-
Copy the abstract to the clipboard: as previous item except that
only the abstract of the book is copied
-
Copy items: Copy components from one oStorybook file to another
-
Preferences: view/change the general preferences of oStorybook
-
Spell Check: Spell Check Tool Setting
-
New: the submenus correspond to the creation of the various components
-
Tables: The submenus correspond to the different tables, which are
grouped into two main categories: Main components, Secondary components
-
Tools
-
Search for words: Search for one or more words in the database
-
Order Chapters: To change the order of chapters
-
Rename: The submenus permit the renaming of different components
(city or country of locations, category of label, category of
object)
-
View: see chapter "14. Detail of views"
-
Reports: see chapter "15. Details of reports"
-
Parts: allows you to change the part you are working on
-
Window: to manage the layout of the different views
-
Help
-
Online documentation: on the website, opens your browser
-
Frequently Asked Questions: on the website, opens your browser
-
Homepage: on the website, opens your browser
-
Bugs: to report an anomaly on the website, opens your browser
-
About oStorybook: software information
-
Check for updates: check if a new version of oStorybook has been
published
-
Trace: to be used on instructions of the development team,; this
is sometimes necessary to diagnose a problem
debut | précédent | sommaire | suivant | fin